TELEMEDICINE SERVICES
We are now offering telemedicine sessions for patients who reside in the state of Texas. Telemedicine is perfect for you if you:
- Are currently engaged in a treatment plan with Kristen that relies heavily on herbal medicine and/or dietary supplements (this is probably you if you are being treated for a gynecological, endocrine, pulmonary, gastrointestinal, autoimmune, psychological, or dermatological issue) but cannot come to the clinic because of distance or illness.
- Have a suspected or confirmed case of COVID-19 and are would like to take advantage of herbal strategies that have proven useful in China. (Please note that Chinese herbal medicine is not a substitute for conventional medical diagnosis and treatment and should only be used as a supportive measure for patients who have been told by their physician that they are stable enough to recover at home.)
We are eager to get back to gold standard care, which is full-scope/in-person Chinese medicine (including acupuncture), as soon as possible. In the meantime, however, our goal with telemedicine is to minimize disruption to your current treatment plan, to support your immune function, to assist you in illness prevention and/or recovery, and/or to address emotional challenges associated with the COVID-19 pandemic. Depending on the particulars of your situation, sessions may include:
- Prescription of herbal medicines and/or dietary supplements (picked up from the non-contact dropbox outside our clinic or shipped to you).
- Individualized dietary and/or lifestyle advice.
- Instruction in a variety of targeted self-care techniques.
- Answers to your questions.
Session are conducted using a HIPAA-compliant and secure video-conferencing platform. In the event that you lack the technology required for video sessions, sessions can also be conducted by telephone.
Please call 254-741-6030 to schedule your session.
HOW TO TEST YOUR TELEMEDICINE SETUP
Every minute counts during your session with your provider, so to avoid spending the first few minutes of the call asking “Can you hear me now?” or “Are you able to see me?” we recommend testing your setup!
In this guide, we’ll show you how to confirm your camera and microphone are working for the video call before your appointment starts.
1. Test via Email Appointment Reminder
When your online appointment is booked, your provider will send you a Thanks for Booking email as confirmation. They may also send you a friendly Appointment Reminder email prior to the appointment.
If you’re subscribed to receive these emails, you’ll see a section like this in the email body:
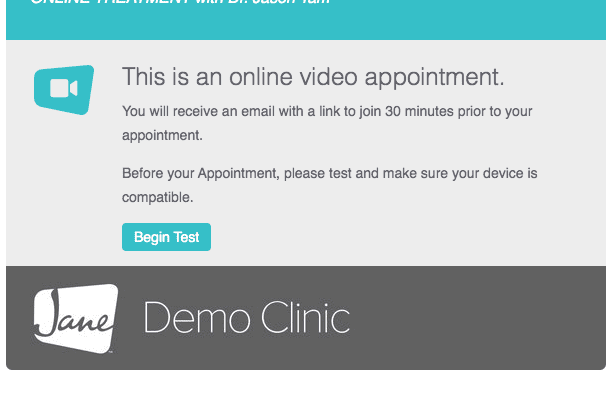
Give the Begin Test button a click and it’ll take you to the Online Appointments page to help you get the best results for your upcoming video call.
2. Test via My Account
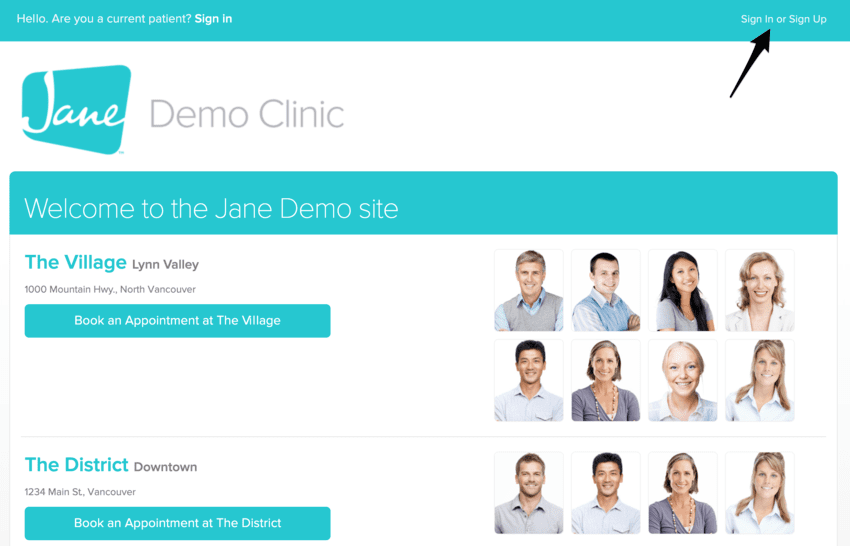
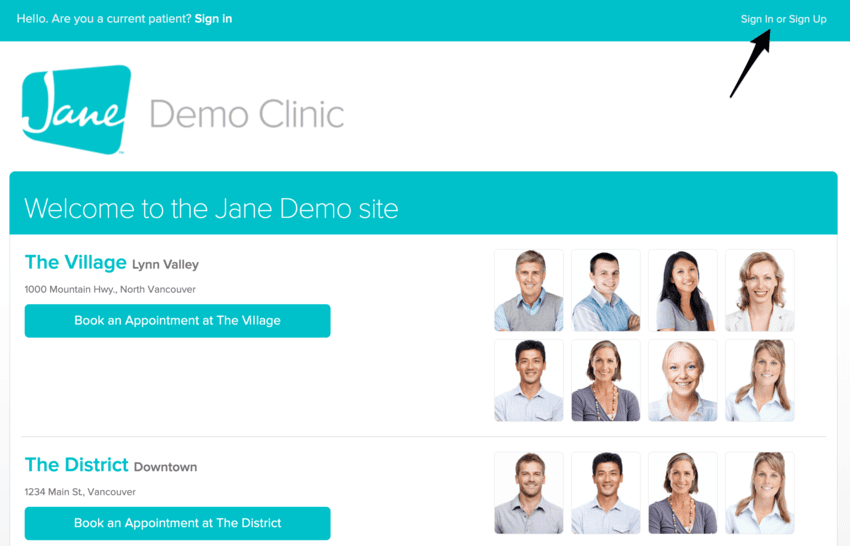
Start by logging into your account by visiting your clinic’s Jane site, using the Sign In/Sign Up button in the top right-hand corner.
The URL to the clinic’s Jane site will look something like clinicnamehere.janeapp.com— often, clinics will include a direct link to their Jane online booking site on their website, but you can always ask if you are unsure!
Once you have logged into your account, you will want to head to the Upcoming Appointments tab on the left-hand side. If you have an upcoming Online Appointment, you will see a blue banner letting you know that you can test your video.
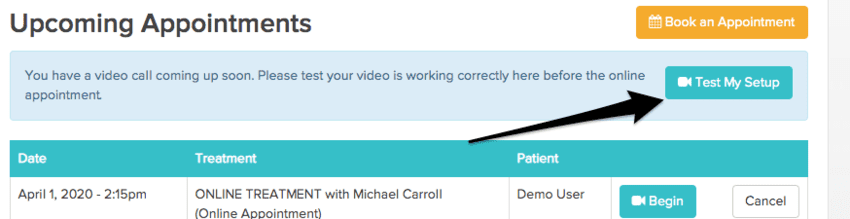
Click the Test My Setup button and it’ll take you to the Online Appointments page to help you get the best results for your upcoming video call.
Testing Your Setup
On the Online Appointments Test page, you’ll see our recommendations for having a successful online appointment:
- Make sure you’re using our recommended browser (Chrome) on a computer or Android device. If you have an iOS device like an iPhone or iPad, you can join the call using our new iOS mobile app!
- Check your internet connection at fast.com to make sure it’s fast enough
- Make sure you’re somewhere private for your call
- Check your battery and charge it before your call if needed
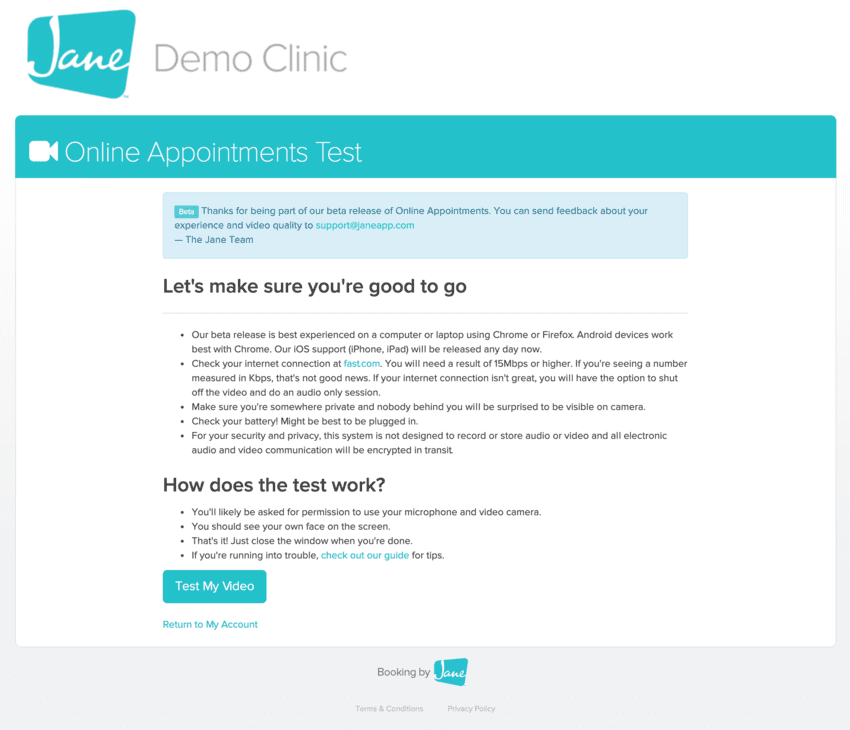
When you’re ready to begin, click Test My Video to open the test call in a new window.
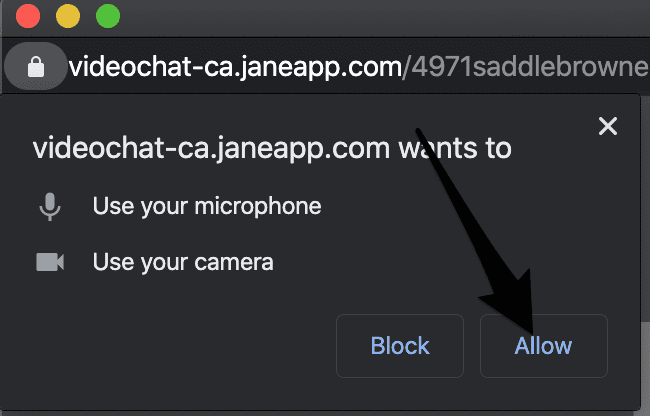
In the test call window, you’ll want to grant your browser permission to use your camera and microphone for the video call. When this comes up, click Allow as shown below.
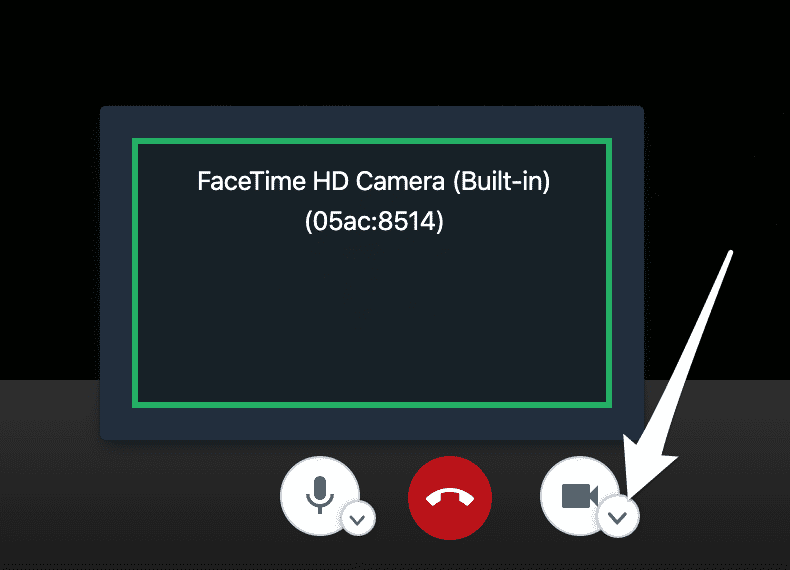
Once you’ve granted these permissions, you should see your video from the device in the window. If you don’t see it or if your camera isn’t working, make sure your video is turned on by clicking the Start / Stop camerabutton so it’s solid like the screenshot below. You can also click the little arrow below it to bring up a preview.
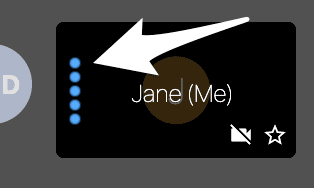
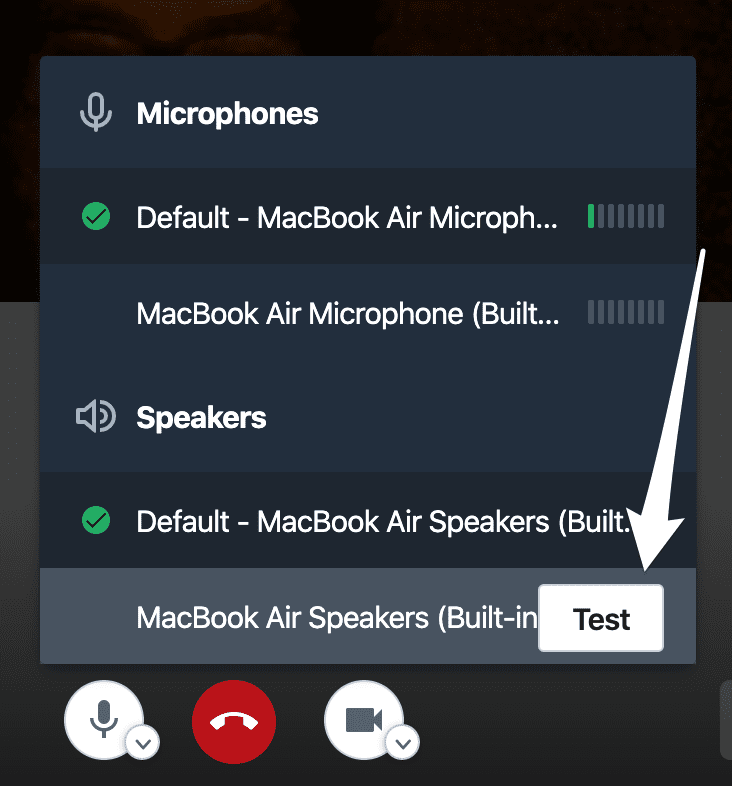
Next, you’ll also want to make sure your microphone is picking up sound. Look for the sound indicator on the profile icon and make some noise! You should see the blue dots change as you get louder. If you don’t see it change, make sure you’re not muted by checking the Mute button at the bottom of the screen.
If you’re still finding the microphone isn’t working, you can try choosing a different one by clicking on the little arrow below the Mute button. You’ll see all the microphone choices in the list with a sound indicator so you can see which ones are picking up your voice. Choose the best one by clicking it. You’ll see the green checkmark highlight your selected mic.
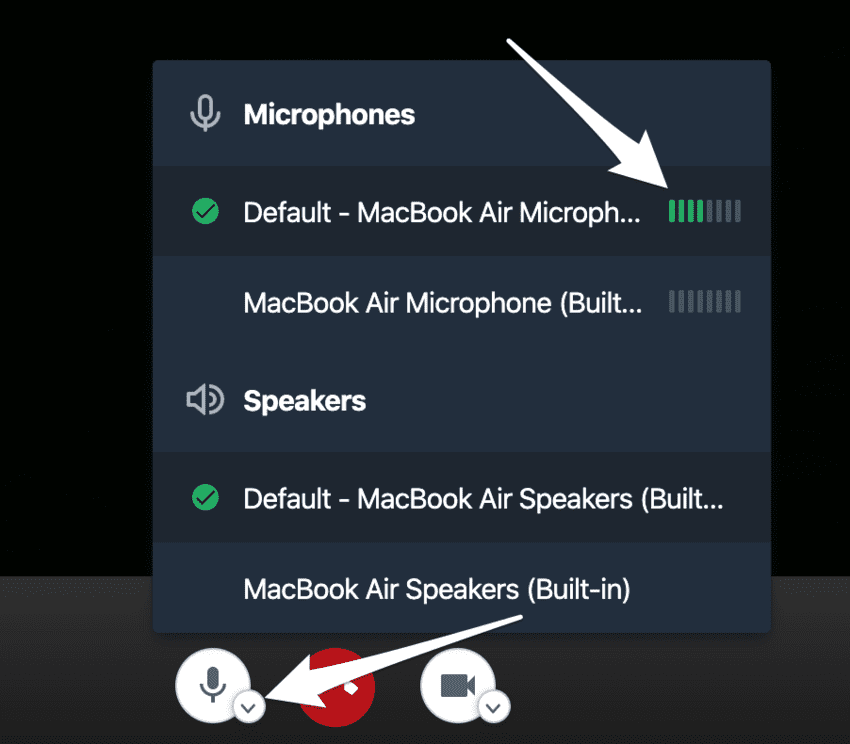
Don’t forget to check your speaker as well! You can find your speakers listed in the same menu above. If you hover over each speaker option, the menu will show a Test button. Test each one to find which works best for your online appointment. When you found the best one, give it a click to select it. You’ll see the green checkmark beside your selected speaker.
When you’re done with the test call, simply click Leave Call at the bottom of the screen.
That’s it! You’re all set for your online appointment.
HOW TO JOIN YOUR TELEHEALTH APPOINTMENT
This guide assumes that you already have an online appointment booked in with your provider. You will want to reach out to your clinic directly if you are unsure!
Let’s get you connected for that upcoming video call!
We recommend using the latest version of Chrome on your desktop or laptop computer.
To join your session on an iPhone or iPad, hop over to the following guide: iPhone/iPad Instructions
There are two ways you can begin your Online Appointment.
1. Join via Email Appointment Reminder
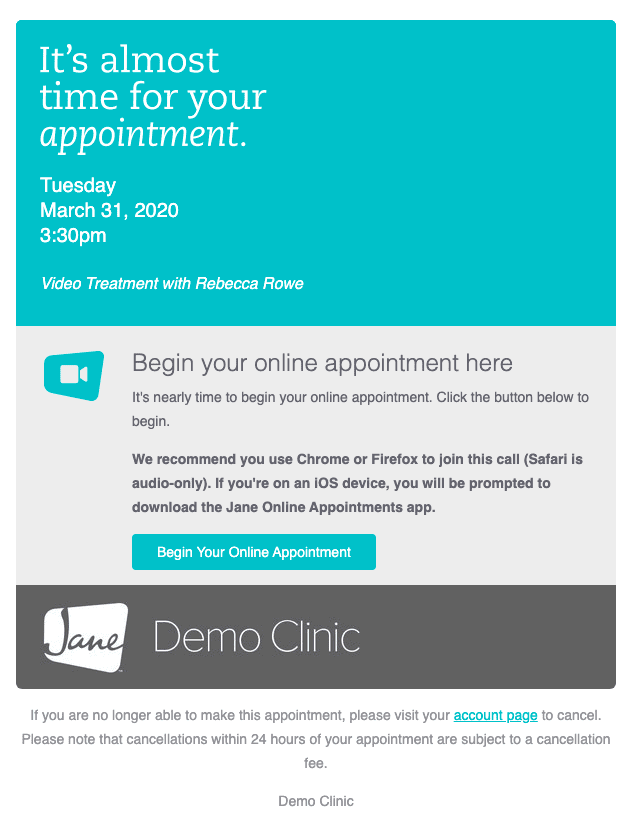
You will receive an Appointment Reminder email sent to you by your provider 30 minutes before your scheduled appointment time.
Click the button at the bottom of the email to begin:
2. Join via My Account
Alternatively, you can access this same button by logging into your account by visiting your clinic’s Jane site, using the Sign In/Sign Up button in the top right-hand corner.
The URL to the clinic’s Jane site will look something like clinicnamehere.janeapp.com— often, clinics will include a direct link to their Jane online booking site on their website, but you can always ask if you are unsure!
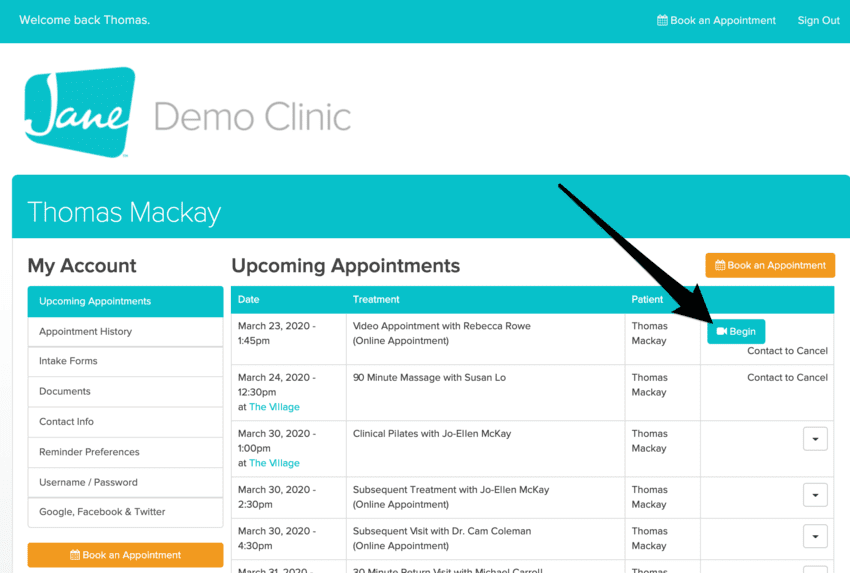
Once you have logged into your account, you will want to navigate to the Upcoming Appointments tab on the lefthand side, then click the blue Begin button next to today’s appointment.
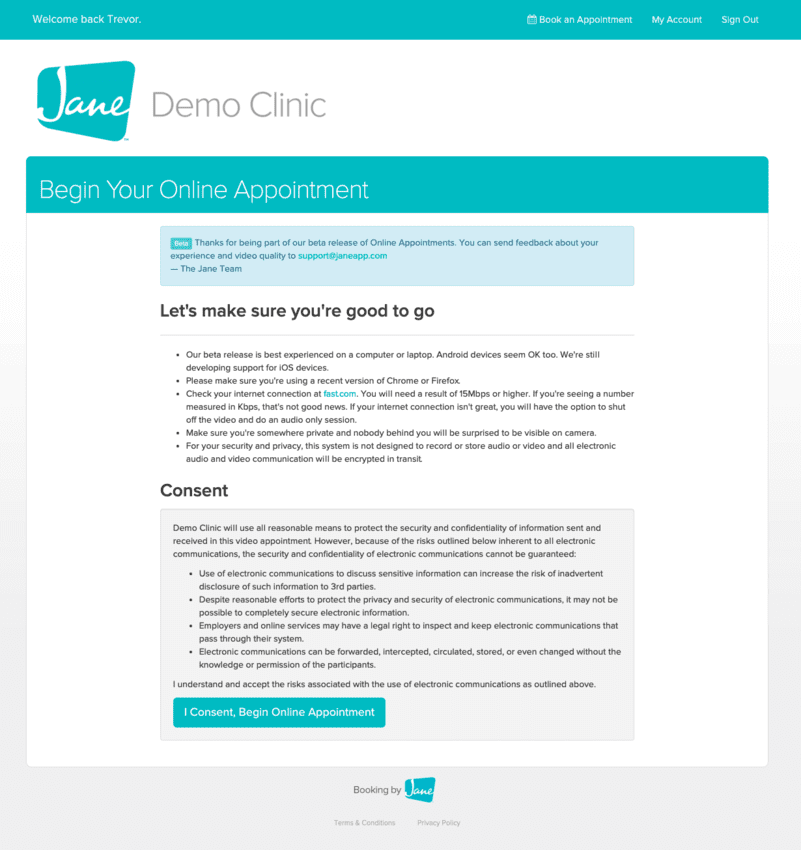
For your security and privacy, Jane’s Online Appointment is not designed to record or store audio or video and all electronic audio and video communication will be encrypted in transit.
On the next page, you will see a quick reminder to use the right browser and a fast internet connection for the video call. Jane and the clinic will need your consent before your video call begins. To provide it, click the I Consent button.
We recommend you use the latest stable version of Chrome as well as a fast internet connection. If you’re having trouble with your Online Appointment, refer to this troubleshooting guide.
This will start the call in a separate window.
Once you have joined the call, you will be able to:
- Mute or unmute your audio
- Enable or disable the video camera
- Send messages to the other participant
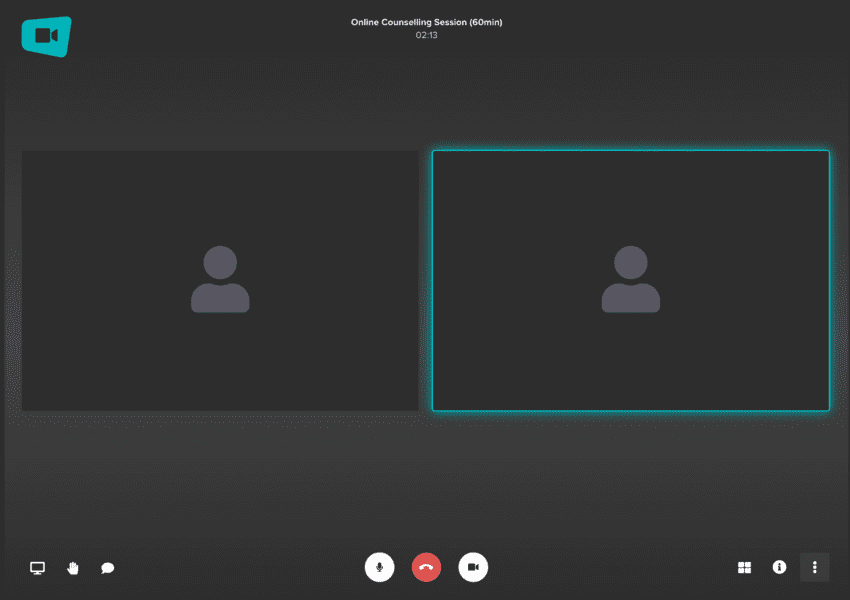
Heres what each of the icons do, starting from the left:
- Screen share – A picture is worth a thousand words and sharing your screen with your practitioner helps share that information easier!
- Raise hands – Click this to politely let the practitioner know that you want to speak.
- Text Chat Window – Use this to chat with your practitioner through text and emojis
- Mute/Unmute – Great for those moments when you need to mute sounds during the call
- Leave call – When you’re finished with your call, click here or simply close the tab.
- Enable/Disable video – Click here to enable or disable your video
- Tile View – Tile view lets you see everyone side by side
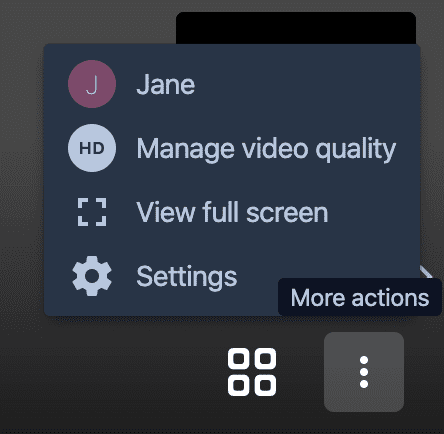
- More actions
- Profile – Want to change your name in the chat
- Change video quality (High, Normal, Low, Low bandwidth) – If you’re finding the video a little choppy, lower the video quality here to help maintain a smooth online appointment
- View full screen
- Settings – Opens the window to see all the settings mentioned above
When you are ready to end the call, click the red Leave Call button at the bottom of the screen.
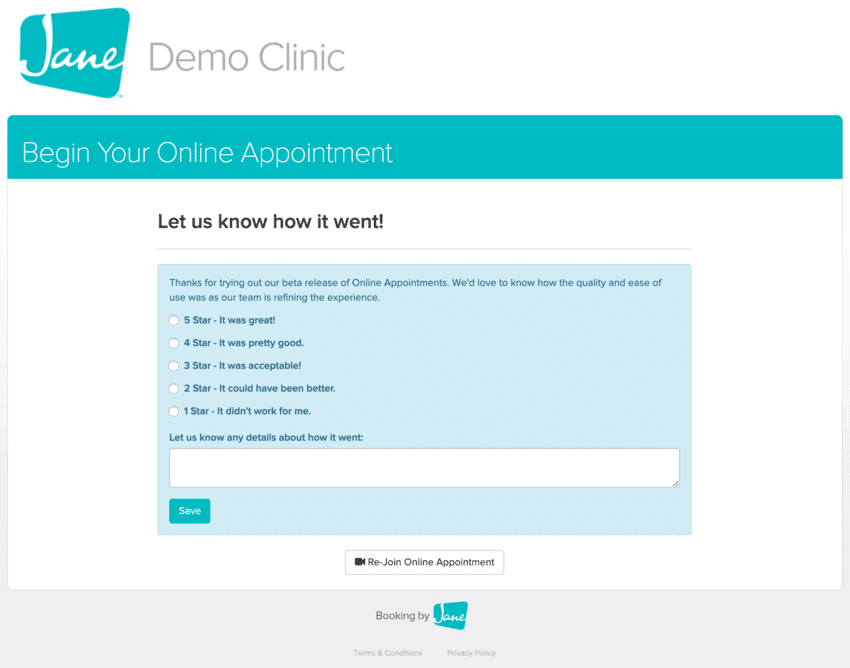
After the Online Appointment
Once you leave the call, you’ll have an opportunity to share your feedback about the video call with the Jane team as we look to continue refining the experience.
It’s important NOT to provide any private health information in this feedback since it will be reviewed by the Jane team
It’s important NOT to provide any private health information in this feedback since it will be reviewed by the Jane team
